Hi there, this is the penultimate post for this series and probably the last one with me as the primary author. This series started as a part of the midterm project that Christina and I had been working for our hands-on deep learning class at Brown University, Data Science Initiative. The links for the first two parts are here:
- Bangla Character Recognition System — The Deep Learning Way (1/3)
- Bangla Character Recognition System — The Deep Learning Way (2/3)
The task at hand is the Kaggle competition, which involves classifying Bengali hand-written characters into 3 target classes — Grapheme roots, Vowel diacritics and Consonant diacritics.
In the first post, we discussed the data-set, enumerating the different classes and the class balances. We also discussed the image pre-processing steps that were undertaken such as denoising, thresholding and cropping. We also talked about the possible data augmentation pipeline.
In the second post, we discussed a bit about the general ideas of a convolution neural net and DenseNet, a particular convolution net based architecture where each layer takes as input the output of the previous layer but also the inputs of the preceding layers up to a certain extent (precisely all preceding convolution layers within the particular dense block).
In this post, we shall primarily talk about the fine tuning of our candidate model (or SayanNet v4 as I call it to fuel my passive narcissism :P ). Following which we shall present the final result. We shall talk a bit about the output of different convolutional layers with respect to a particular image. As a closing note, we would suggest the different upgrades that could be made to the model for squeezing out the last bits of accuracy. Let’s get at it then.
Hyperparameter Tuning
We chose to use TensorBoards HParams¹ dashboard for an exhaustive search through over a range of hyper-parameters. Due to the constraints of the project delivery deadline and computational resources, we had to keep to search space pretty narrow but at the same time there were a few interesting knobs to turn on.
- No. of filters — We kept the no. of filters in each dense block fixed, but experimented with the number. This decides the no. of filters at the output of the dense block. We searched over 8,12,24 and 32 filters.
- Growth rate — We also performed a search over the growth rate, that decide the no. of filters for each convolution layer within each dense block. Our search space was 4,6,12 and 16 filters.
- Layers in a block — This parameter sets the no. of convolution layer within each dense block. In our case we tried 4 and 6 layers in a single block.
- Dense block size — This is the no.of dense blocks in our model. Our search experimented between a block size of 3 and 5.
One of the primary reason for using HParams is the neat visualization provided by TensorBoard for analysis. Here is result of the 64 different scores from the 64 different combination of hyper-parameters. Again, due to computational and time constraints, these values were used on the full pre-processed data-set but for 10 epochs only.
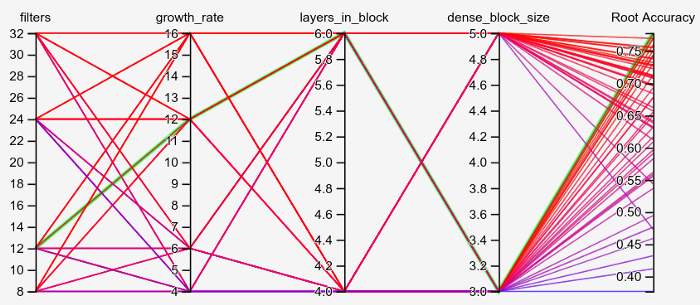
The green line indicates the best combination of hyper-parameters. For the purpose of our project, we settled on
- Filters — 12
- Growth rate — 12
- Layers in a block — 6
- Dense block size — This is the no.of dense blocks in our model. Our search experimented between a block size of 3 and 5.

On the top you can see the new training curves. You can ignore the slight notch at around the ~55th time-step. Colab runtime got re-started and we had to resume training with a higher learning rate.
On the top you can see the new training curves. You can ignore the slight notch at around the ~55th time-step. Colab runtime got re-started and we had to resume training with a higher learning rate.
Here is the final entry into Kaggle.
Each score is with a slightly different tweak to the model we described here. The predictions are roughly the same.
The scores are not very encouraging if compared with the competition leaderboard. However, we ran out of time to perform any data augmentation. Perhaps, local normalization, as had been performed by AlexNet might boost accuracy. We also guess Transfer Learning from popular models such as VGGnet, ResNet, InceptionNet etc. with frozen pretrained layers would be an interesting examination (more on this in the next post). Our hyper-parameter search only skimmed the surface of the otherwise massive parameter space that define our model. Plus, who knows, maybe more compute, maybe a multi-model averaged prediction could be useful. The options to tweak are huge.
Convolution Net Interpretation
We also plotted the different parts of a image (স্ট্রী) as viewed from the different filters of each convolution layer.
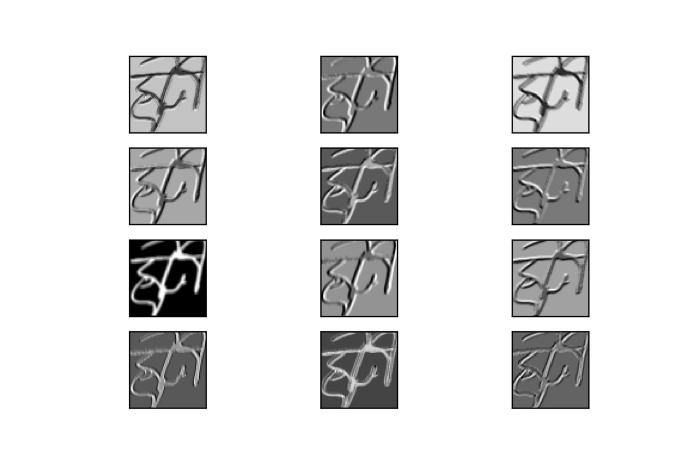
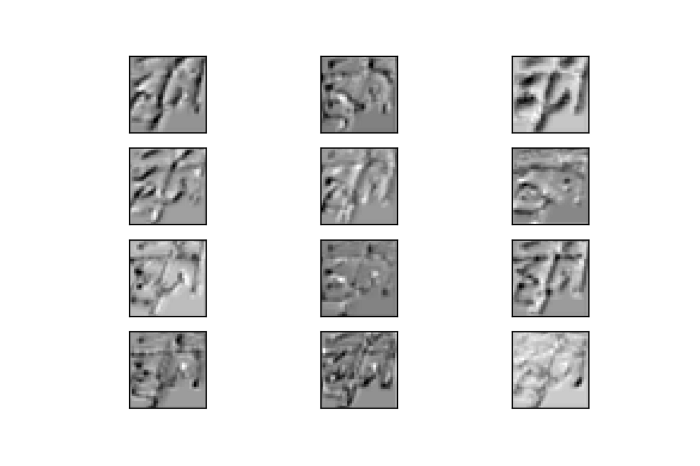
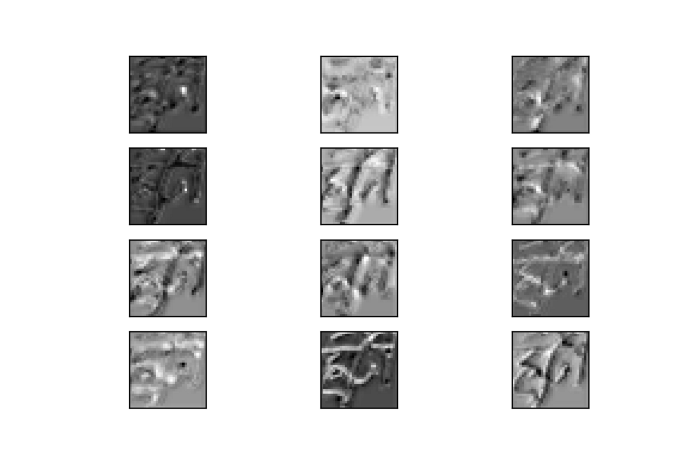
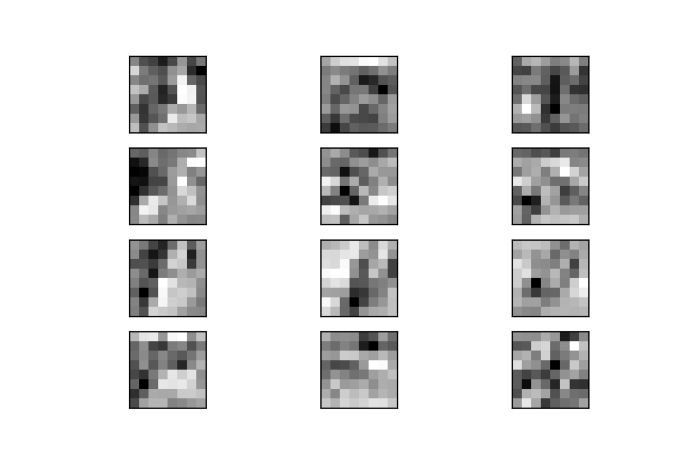
As you can see from the images, the top few layers kind of does a good job of beveling the image around the contours with different styles, and the deeper layers find finer differences also around the contours. A common thread in the first few layers is the network learns to extract the written part from the background canvas. As we go deeper, since the layers pick up on more general patterns, it gets difficult to interpret. But there is no doubt that some form of hierarchical feature mapping is going on.
Ending Note
We will be calling it a wrap with this project here. Although Christina on her blog will be posting an epilogue where we shall discuss the performance of the other models from different better scoring models and the previously mentioned pretrained networks. I shall post the link here once that is done.
In between the things which worked, there were 10 different things that didn’t work but the final result is a culmination of all those attempts. The learning curve was steep (with proper regularization :P), and it was great fun. Thank you all for taking the time to read this fledgling attempt. Shout out to the winners and everyone in the leaderboard, those guys did an amazing job. See you all in the next project.
আবার দেখা হবে এখনই শেষ দেখা নয়
আবার দেখা হবে এখনই শেষ কথা নয়
চীয়ার্স!
সায়ন এবং ক্রিস্টিনা
Sayan and Christina
All codes for the project can be found in this github repository
References